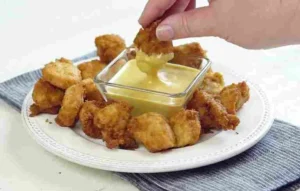
The perfect chicken tenders should be able to give two things: a super crispy coat and tender, juicy chicken meat that isn’t dry at all. That’s precisely what this chicken tenders recipe gives you, and you can make them by deep frying, baking, or using the air fryer method. You don’t need any special gadgets, and you don’t need a chef for this one: just simple instructions that give you better chicken tenders than anything from fast-food restaurants or frozen packets.
The thing that makes this recipe stand out from other recipes is its reliance on different elements, including the use of buttermilk in the marination process, double-coating in dredges, and making sure you’re frying at a high enough temperature. Every step plays a crucial role.
Quick Answer: At a Glance
| Prep Time | 15 minutes (plus 30 min to 2 hour marinating) |
| Cook Time | 12–15 minutes (frying) / 20–22 minutes (oven) / 14–16 minutes (air fryer) |
| Total Time | 45 minutes (minimum) |
| Servings | 4 (makes approximately 12–14 tenders) |
| Difficulty | Easy |
| Best Method | Deep frying for maximum crunch; air fryer for everyday ease |
| Calories | Approximately 380 kcal per serving (fried) |
Why You’ll Love This Recipe
- Non-fatty exterior that maintains its crispness, even after sitting—no softening
- Moist chicken inside due to the buttermilk-based marinade that softens the chicken
- Great for any cooking technique you choose: frying, baking, and even air frying—all with one batter
- Made in less than an hour (including marinating time, or overnight for extra flavor)
- Ideal for families and entertaining; suitable for any day of the week
- Fresher taste compared to pre-made tenders; no additives or mysterious substances
Chicken Tender Ingredients
Making truly crispy and juicy chicken tenders starts with the right ingredients. Every ingredient in this recipe has a purpose, from creating a crunchy coating to keeping the chicken tender inside. Using quality ingredients and the correct ratios makes a noticeable difference in both flavor and texture.
The Chicken
Chicken tenderloins are the best option because they cook evenly and naturally stay tender. Boneless skinless chicken breasts also work well when sliced into even strips about 1 inch thick. Keeping the pieces similar in size helps everything cook at the same speed and prevents dry or undercooked tenders.
Wet Marinade
The marinade is what gives homemade chicken tenders their juicy texture and deep flavor. A combination of buttermilk, egg, and seasonings helps tenderize the chicken while also helping the coating stick properly during cooking.
For the marinade, you will need:
1 cup buttermilk
1 large egg
1 tsp hot sauce (optional)
Salt to taste
Black pepper to taste
Dry Coating
The coating creates the crispy outer crust that makes chicken tenders so satisfying. Using both flour and cornstarch gives the coating a lighter and crunchier texture than flour alone.
For the dry coating, you will need:
1 cup all-purpose flour
1/2 cup cornstarch
1 teaspoon garlic powder
1 teaspoon onion powder
1 teaspoon smoked paprika
1/2 teaspoon black pepper
1 teaspoon salt
1/2 teaspoon cayenne pepper (optional)
For Frying
The type of oil matters because it affects both flavor and crispiness. Neutral oils with a high smoke point work best for frying chicken tenders.
Recommended oils include:
Vegetable oil
Canola oil
Peanut oil
Use enough oil to fill a heavy pan about 2 to 3 inches deep so the tenders cook evenly and develop a crispy, golden crust.
Why Each Ingredient Matters
Buttermilk
Buttermilk helps tenderize the chicken by gently breaking down proteins on the surface of the meat. This creates chicken tenders that stay juicy instead of becoming dry and chewy. It also helps the coating stick better during frying.
Cornstarch
Cornstarch is one of the biggest secrets behind restaurant-style chicken tenders. It creates a crispier and lighter coating because it absorbs less oil than flour. This helps the crust stay crunchy longer after cooking.
Smoked Paprika
Smoked paprika adds more than flavor. It also gives the chicken tenders their rich golden color. Without paprika, the coating can look pale even when fully cooked.
Egg in the Marinade
Adding egg to the marinade improves the coating texture by helping the flour mixture stick more evenly to the chicken. This creates a thicker crust that stays attached during frying.
Ingredient Substitutions
You can still make excellent homemade chicken tenders even if you need to swap a few ingredients.
If you do not have buttermilk, mix regular milk with a small amount of lemon juice or vinegar and let it sit for a few minutes before using.
Cornstarch can be replaced with potato starch for a similarly crispy texture.
For a milder flavor, skip the cayenne pepper. If you prefer extra heat, add additional paprika or chili powder to the coating.
Gluten-free flour blends can also work well for the coating if needed.
Best Chicken to Use for Homemade Chicken Tenders
The cut of chicken you choose has a direct impact on texture, tenderness, and cooking time.
Chicken Tenderloins vs Breast Strips
Chicken tenderloins are naturally tender and require very little prep work. They are already shaped perfectly for homemade tenders and cook evenly.
Chicken breast strips are another excellent option and are usually more budget-friendly. Slice them against the grain to keep the chicken tender after cooking. Try to keep every strip close to the same thickness for even frying.
Fresh vs Frozen Chicken
Fresh chicken usually gives the best results because it absorbs marinade more effectively and fries more evenly. Frozen chicken can still work well if fully thawed before use.
After thawing frozen chicken, pat it completely dry before marinating. Too much moisture on the surface can prevent the coating from becoming crispy.
Why Thickness Matters
Chicken pieces that are too thick may burn on the outside before the center cooks through. Pieces that are too thin can dry out quickly.
For the best texture, keep the chicken between 3/4 inch and 1 inch thick. Uniform pieces help every tender cook evenly and develop the same crispy finish.
How to Make Chicken Tenders at Home
Making crispy chicken tenders at home is mostly about getting the small details right. The marinade keeps the chicken juicy, the seasoned coating builds texture, and proper frying gives you that golden crispy crust without drying out the inside. Once you make them a few times, the process becomes simple and consistent.
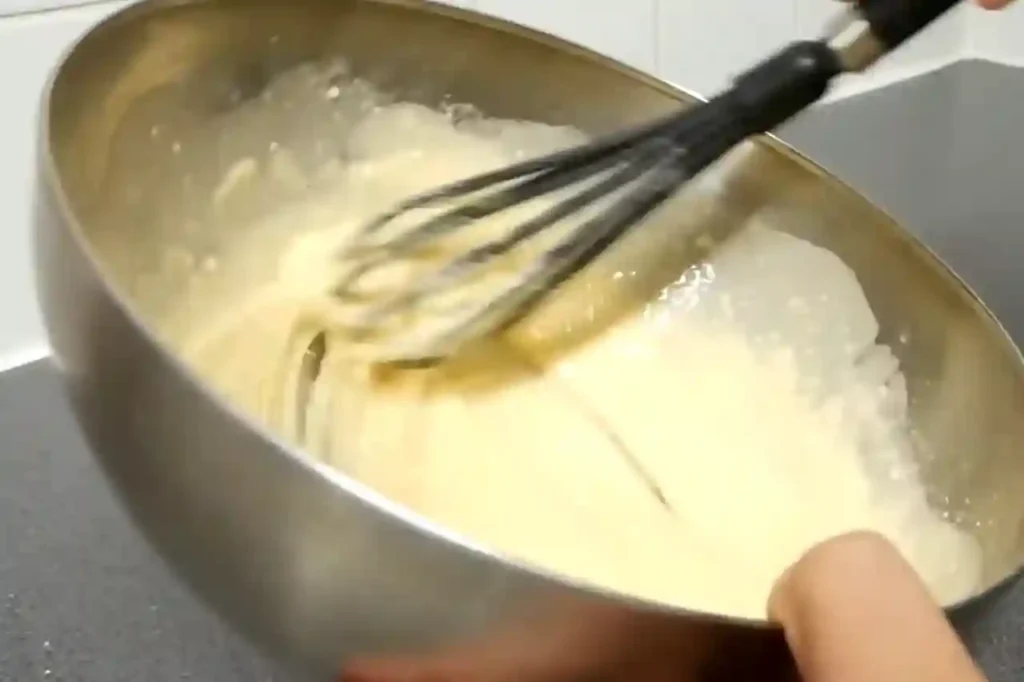
Step 1: Prepare the Marinade
In a large mixing bowl, whisk together the buttermilk, egg, and hot sauce until the mixture looks completely smooth. Make sure the egg is fully blended into the buttermilk because uneven mixing can affect how well the coating sticks later.
The buttermilk does more than add flavor. It helps tenderize the chicken and creates a slightly sticky surface that allows the flour coating to cling properly during frying. The hot sauce will not make the tenders overly spicy, but it adds a deeper flavor in the background.
Step 2: Marinate the Chicken
Place the chicken tenderloins into the marinade and coat every piece evenly. Cover the bowl and refrigerate for at least 30 minutes. If you have extra time, letting the chicken marinate for around 2 hours gives better flavor and a softer texture.
Longer marination works well too, especially overnight, but avoid going beyond 24 hours. Too much time in the buttermilk can start changing the texture of the chicken and make it slightly mushy instead of tender.
Step 3: Prepare the Seasoned Coating
In a wide shallow dish, combine the flour, cornstarch, salt, garlic powder, onion powder, paprika, black pepper, and any additional seasonings you are using. Mix everything thoroughly so the spices are evenly distributed throughout the flour.
Using a shallow dish makes coating the chicken easier and less messy. The cornstarch is important here because it helps create a lighter and crispier crust instead of a heavy coating.
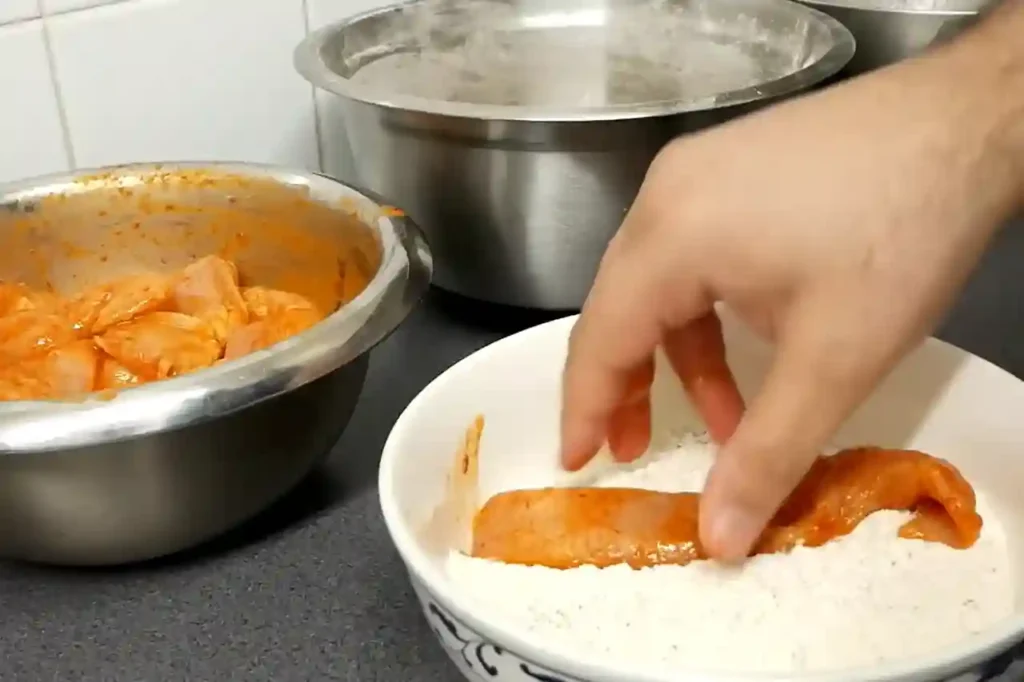
Step 4: Coat the Chicken
Take each piece of chicken out of the marinade and allow the extra liquid to drip off naturally. Press the chicken into the flour mixture firmly so every side gets fully coated.
Do not rush this step. Proper coating is what creates that crispy outer layer. After coating, lightly shake off the excess flour. Too much loose flour can burn in the oil and create an uneven texture while frying.
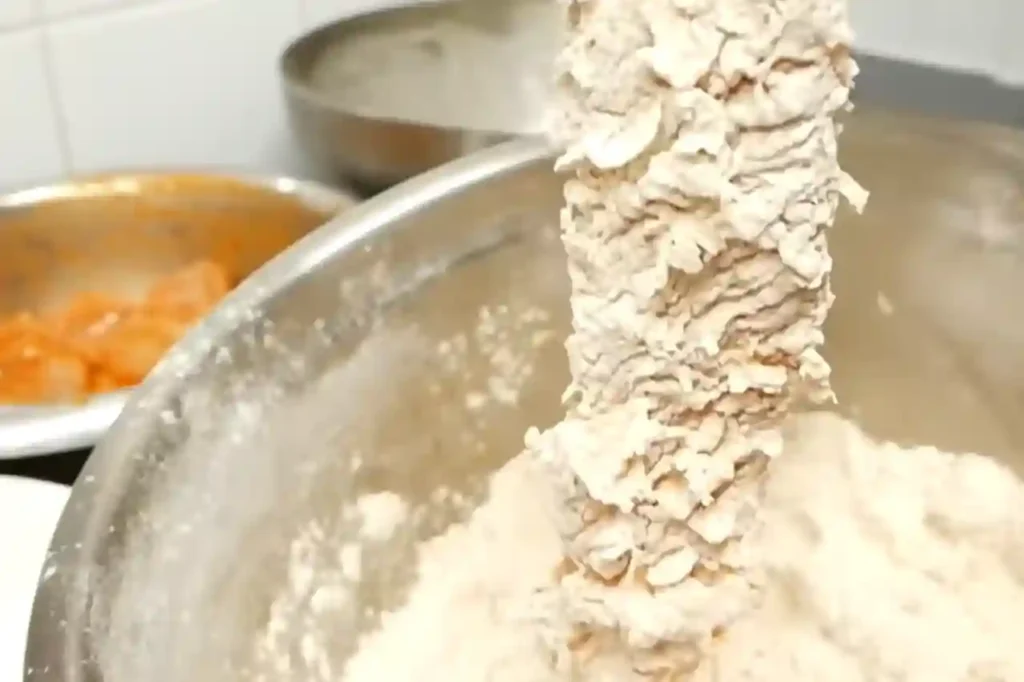
Step 5: Double Coat for Extra Crispiness
For a crunchier restaurant-style texture, dip the coated chicken back into the marinade briefly and coat it in the flour mixture one more time. This second layer creates the rough, crispy edges that make homemade chicken tenders taste closer to what you get from restaurants.
Place the coated tenders on a wire rack and let them rest for about 10 minutes before frying. This resting time helps the coating stick better and reduces the chance of it falling off in the oil.
Step 6: Fry Until Crispy and Golden
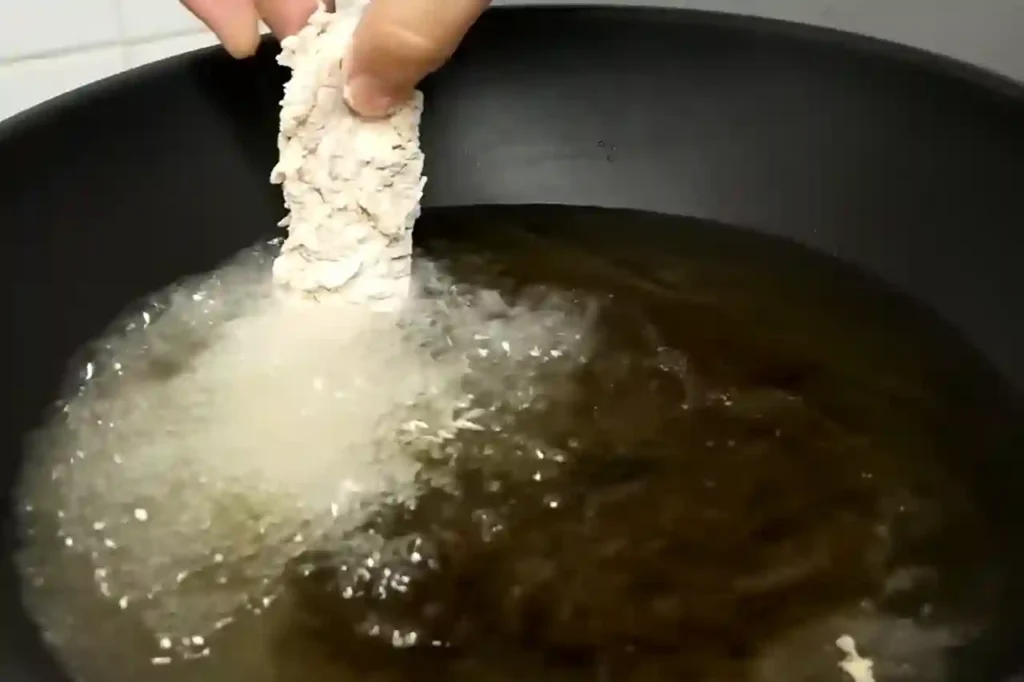
Heat oil in a deep heavy pan over medium heat until it reaches 350°F. Maintaining the correct oil temperature is one of the biggest factors in getting crispy chicken tenders. If the oil is too cool, the coating absorbs excess oil and turns greasy. If it is too hot, the outside browns too quickly before the chicken cooks through.
Carefully place the tenders into the hot oil in small batches. Avoid overcrowding the pan because it lowers the oil temperature and affects crispiness. Fry each piece for about 3 to 4 minutes per side until the coating becomes deep golden brown and the chicken reaches an internal temperature of 165°F.
Transfer the cooked chicken tenders to a wire rack instead of paper towels. A wire rack keeps air circulating around the coating so the crust stays crispy longer instead of becoming soft from trapped steam.
If you still have questions about the coating texture, frying method, or how crispy the chicken should look at each stage, watching the full video tutorial can make the process much easier to follow. Seeing the dredging, double coating, and frying steps visually helps a lot, especially if you are making homemade chicken tenders for the first time.
You can watch the complete video guide here:
Chicken Tenders Video Tutorial
Expert Tips for the Best Chicken Tenders
The small details are usually what separate average chicken tenders from the kind that stay crispy, juicy, and flavorful from the first bite to the last. A few simple adjustments during cooking can completely change the final result.
Use a Wire Rack Instead of paper towels.
One of the biggest mistakes people make is placing freshly fried chicken tenders directly onto paper towels. While paper towels absorb extra oil, they also trap steam underneath the coating. That trapped moisture softens the crust surprisingly fast.
A wire rack works much better because air can circulate around the chicken while it rests. The coating stays crisp, light, and crunchy instead of turning soft after a few minutes.
Oil Temperature Matters More Than Most People Think
Keeping the oil at the right temperature is one of the most important parts of frying chicken properly. If the oil drops below 350°F, the coating starts soaking up excess oil before it has time to crisp. That usually leads to greasy chicken tenders with a heavy texture.
If the oil gets too hot, the outside browns too quickly while the inside stays undercooked. Keeping the temperature between 350°F and 375°F gives the coating enough time to become golden and crispy while the chicken cooks evenly inside.
Using a kitchen thermometer removes the guesswork completely and gives much more consistent results.
Avoid Overcrowding the Pan
Adding too many chicken tenders at once causes the oil temperature to drop immediately. Instead of frying properly, the chicken starts steaming inside the pan, which affects both texture and color.
Cooking in smaller batches gives each piece enough space to fry evenly. It also helps maintain a steady oil temperature, which keeps the coating crisp and prevents soggy spots.
Let the coating rest before frying.
After coating the chicken, let it rest on a wire rack for about 5 to 10 minutes before placing it into the oil. This short resting period allows the flour mixture to absorb some moisture from the marinade and stick more firmly to the surface.
Skipping this step often leads to coating that breaks apart or falls off during frying.
Keep the Chicken Cold Before It Hits the oil.
If you prepare the chicken ahead of time, keep the coated tenders chilled in the refrigerator until you’re ready to cook. Cold chicken going into hot oil creates a stronger contrast in temperature, which helps the coating crisp up faster and more evenly.
This simple trick is commonly used in restaurant kitchens because it improves texture without adding extra work.
Season the Flour Properly
A crispy coating does not automatically mean flavorful chicken. One reason restaurant chicken tenders taste better is because the flour mixture is seasoned properly from the start.
Be generous with ingredients like salt, garlic powder, onion powder, and paprika. The seasoning in the coating is what gives the crust its savory flavor, not just the dipping sauce served on the side.
Air Fryer Chicken Tenders
Air fryer chicken tenders are one of the easiest ways to get a crispy coating without using large amounts of oil. The texture is lighter than deep-fried chicken, but when cooked properly, the outside still turns golden and crunchy while the inside stays juicy and tender.
Start by preparing the chicken exactly the same way as the main recipe. Marinate the chicken in the buttermilk mixture, coat it in the seasoned flour, and use the double-dredge method if you want a thicker, crispy crust. The coating technique matters just as much in the air fryer as it does in deep frying.
Before adding the chicken, lightly spray the air fryer basket with cooking oil spray. This helps prevent sticking and improves browning. Give the coated chicken tenders a light spray of oil as well. That small amount of oil helps the flour coating develop a deeper golden color and a crispier texture during cooking.
Arrange the chicken tenders in a single layer inside the basket with a little space between each piece. Avoid stacking or overcrowding because proper airflow is what makes the coating crisp evenly on all sides.
Cook the tenders at 400°F (200°C) for about 7 to 8 minutes. Flip each piece carefully, spray lightly with oil again, and continue cooking for another 6 to 8 minutes until the coating becomes golden brown and the chicken reaches an internal temperature of 165°F.
Once cooked, transfer the chicken tenders to a wire rack and let them rest for a couple of minutes before serving. This short resting time helps the coating stay crisp instead of softening from trapped steam.
Keep in mind that air fryer models can cook differently depending on size and power. Some machines run hotter than others, so checking the chicken around the 12-minute mark is a good idea the first time you make them. as needed based on thickness and your specific machine.
Oven-Baked Chicken Tenders
Oven-baked chicken tenders are a great option when you want something crispy and flavorful without deep-frying. They do not have the exact same texture as fried chicken, but with the right coating and proper baking method, they still come out crunchy on the outside and juicy in the center.
Start by preheating the oven to 425°F (220°C). Place a wire rack over a foil-lined baking sheet and let it heat in the oven for about 5 minutes. This small step makes a noticeable difference because the hot rack immediately starts crisping the bottom of the coating instead of letting it sit against a cold surface.
Prepare the chicken tenders using the same marinade and seasoned coating from the main recipe. Once coated, spray both sides of the chicken lightly but evenly with cooking oil spray. The oil helps the coating turn golden brown and prevents the flour mixture from looking dry while baking.
Carefully place the coated chicken tenders onto the preheated wire rack, leaving a little space between each piece so the heat can circulate properly. Spacing matters because crowded tenders trap steam, which softens the coating instead of crisping it.
Bake for about 20 to 22 minutes, flipping the tenders halfway through cooking. The outside should look deep golden brown, and the internal temperature should reach 165°F for safe cooking.
If you want extra color and crispiness, turn on the broiler for the final 1 to 2 minutes. Watch closely during this step because the coating can brown very quickly under direct heat.
Let the chicken rest for a few minutes before serving. This helps the coating stay crisp while the juices settle inside the meat.
Best Oil for Frying Chicken Tenders
Choosing the right oil can make a noticeable difference in how your chicken tenders turn out. A good frying oil helps the coating become crispy without burning too quickly or leaving behind a heavy, greasy texture. The most important thing to look for is a high smoke point, which means the oil can handle frying temperatures without breaking down.
Vegetable Oil
Vegetable oil is one of the most common choices for homemade chicken tenders because it is affordable, easy to find, and has a fairly neutral flavor. It handles frying temperatures well and allows the seasoning in the coating to stand out without overpowering the chicken.
For everyday cooking, vegetable oil is one of the safest and most reliable options.
Canola Oil
Canola oil works very similarly to vegetable oil. It has a clean, mild flavor and stays stable at high temperatures, making it a solid choice for frying chicken tenders.
Some people prefer canola oil because it contains slightly less saturated fat while still giving crispy results.
Peanut Oil
Many restaurants use peanut oil for fried chicken because it performs extremely well at high heat. It has a very high smoke point and keeps the coating crisp without breaking down quickly during frying.
Peanut oil also adds a light nutty flavor that pairs really well with seasoned chicken coatings. However, it should obviously be avoided if anyone has a peanut allergy.
Sunflower Oil
Sunflower oil is another excellent option for deep frying. It has a neutral taste and a high smoke point and creates a crisp texture without making the chicken feel overly oily.
Professional kitchens often use it because it stays stable during longer frying sessions.
Oils to Avoid
Not every oil works well for frying chicken tenders. Oils with lower smoke points, like olive oil or butter, can burn quickly at frying temperatures and create bitter flavors.
Butter also contains milk solids that brown too fast in hot oil, which makes it unsuitable for deep frying on its own.
Reusing Frying Oil
If you plan to reuse frying oil, strain it after cooking to remove small burnt crumbs from the coating. Store it in a sealed container once completely cooled.
Try not to reuse frying oil more than 2 or 3 times. Once the oil becomes very dark, starts smoking too early, or develops a strong smell, it is better to discard it and use fresh oil for the next batch.
Homemade Sauces for Chicken Tenders
A crispy batch of chicken tenders gets even better with the right dipping sauce. Some people like creamy sauces, while others prefer something spicy or sweet. The good thing is that most homemade sauces come together in just a few minutes using simple ingredients already sitting in the kitchen.
Classic Ranch
Ranch is probably the most popular dipping sauce for chicken tenders because the cool, creamy texture balances the crispy coating perfectly. To make a quick homemade version, mix mayonnaise, sour cream, buttermilk, garlic powder, onion powder, dried dill, salt, and black pepper until smooth.
Let the sauce chill in the refrigerator for about 30 minutes before serving. The flavor becomes much better once the ingredients have time to blend together.
Honey Mustard
Honey mustard gives you the perfect balance of sweetness and sharp flavor. Combine Dijon mustard, honey, mayonnaise, and a little lemon juice in a bowl and mix until creamy.
This sauce works especially well with crispy chicken because the slight tang from the mustard cuts through the richness of the fried coating without overpowering it.
BBQ Sauce
BBQ sauce adds a smoky and slightly sweet flavor that pairs really well with crispy chicken tenders. You can use a good-quality store-bought sauce or quickly make your own using ketchup, brown sugar, Worcestershire sauce, apple cider vinegar, and smoked paprika.
Homemade BBQ sauce tastes richer and fresher, especially when served warm.
Garlic Aioli
Garlic aioli sounds fancy, but it is actually one of the easiest sauces to make at home. Simply mix mayonnaise with freshly minced garlic, lemon juice, and a little salt.
The creamy garlic flavor goes really well with crispy chicken tenders and gives them more of a restaurant-style feel without requiring much extra effort.
Buffalo Sauce
If you like spicy chicken tenders, buffalo sauce is the obvious choice. Melt butter in a small pan and whisk it together with your favorite hot sauce until smooth.
You can easily adjust the heat level depending on how spicy you want the sauce to be. A little extra butter softens the heat, while extra hot sauce gives it a stronger kick.
Sweet Chili Sauce
Sweet chili sauce is one of the easiest options because it usually requires no preparation at all. The sweet and mildly spicy flavor pairs surprisingly well with crunchy chicken tenders.
It works especially well if you want something lighter than creamy sauces but still full of flavor.
What to Serve with Chicken Tenders
Chicken tenders pair well with almost everything, which is one reason they work for quick family dinners, party platters, and casual weekend meals. The best side dishes are usually the ones that balance the crispy coating without taking attention away from the chicken itself.
French Fries or Potato Wedges
Crispy french fries are the classic side for chicken tenders for a reason. The crunchy texture and salty flavor match perfectly with fried chicken, especially when served with dipping sauces like ranch, honey mustard, or BBQ sauce.
Potato wedges are another great option if you want something thicker and more filling.
Creamy Macaroni and Cheese
Macaroni and cheese adds a creamy texture that contrasts nicely with crispy chicken tenders. It is especially popular with kids and works really well for comfort-style meals.
A homemade cheese sauce makes the meal feel even richer and more satisfying.
Coleslaw
Coleslaw brings freshness and crunch to the plate, which helps balance the richness of fried chicken. The slight tanginess from the dressing cuts through the crispy coating and keeps the meal from feeling too heavy.
It works particularly well with spicy chicken tenders or buffalo sauce.
Corn on the Cob or Roasted Corn
Sweet corn adds a lighter and slightly sweet flavor alongside crispy chicken. Roasted corn has a deeper flavor, while classic corn on the cob keeps things simple and familiar.
This combination works especially well during summer meals or outdoor gatherings.
Side Salad
A simple side salad can make the meal feel more balanced without requiring much extra preparation. Crisp lettuce, cucumbers, tomatoes, and a light dressing pair nicely with fried chicken tenders.
Ranch dressing works well if you want something creamy, while a vinaigrette keeps the meal lighter.
Biscuits or Dinner Rolls
Soft biscuits or warm dinner rolls are perfect for soaking up extra sauce and adding a comforting touch to the meal. Buttery bread pairs especially well with crispy chicken and homemade dipping sauces.
Freshly baked rolls can make even a simple chicken-tender dinner feel more complete.
Waffle Fries with Cheese Sauce
For a more indulgent meal, waffle fries served with warm cheese sauce are hard to beat. The extra crunch from waffle fries and the creamy cheese sauce create a restaurant-style combo that works perfectly with crispy chicken tenders.
Storage and Reheating Tips
Chicken tenders taste best fresh, but if you store and reheat them properly, you can still keep most of that crispy texture the next day. The key is preventing moisture from softening the coating during storage and reheating.
Refrigerator Storage
Let the chicken tenders cool completely before storing them. Placing hot chicken directly into a container creates steam, which quickly softens the crispy coating.
Store the tenders in an airtight container in the refrigerator for up to 3 days. If you need to stack them, place a sheet of parchment paper between each layer to stop the coating from sticking together and becoming soggy.
Freezer Storage
Homemade chicken tenders freeze surprisingly well and are great for quick meals later in the week. After the tenders cool completely, place them in a single layer on a baking tray and freeze them for about 1 hour until firm.
Once frozen, transfer them into a freezer-safe bag or airtight container. Properly stored chicken tenders can last for up to 3 months in the freezer without losing too much quality.
Adding a date label helps keep track of freshness.
Reheating Without Losing Crispiness
The reheating method makes a huge difference in texture. Some methods keep the coating crispy, while others soften it quickly.
Air Fryer Method
The air fryer is easily the best option for reheating chicken tenders. Heat them at 375°F for about 4 to 6 minutes. The hot circulating air crisps the coating again and brings the texture surprisingly close to freshly cooked chicken.
Oven Method
If you are reheating a larger batch, the oven works very well too. Place the tenders on a wire rack over a baking sheet and heat them at 400°F for about 8 to 10 minutes.
Using a wire rack helps hot air circulate underneath the chicken so the bottom stays crisp instead of soft.
Microwave Method
The microwave works when you need something fast, but it is not ideal for crispiness. The coating will naturally soften because of the steam created during reheating.
If using a microwave, place the tenders on a paper towel and heat them in short 30-second intervals to avoid overcooking the chicken.
Reheating from Frozen
You do not need to thaw frozen chicken tenders before reheating them. For the best texture, place them directly into the air fryer at 375°F for around 10 to 12 minutes.
If using the oven, bake them at 400°F for approximately 15 to 18 minutes, flipping halfway through so both sides heat evenly and stay crispy.
Common Mistakes and How to Avoid Them
Even a good chicken tenders recipe can go wrong if a few small details are missed. Most problems come down to temperature, coating technique, or overcooking. Once you understand these common mistakes, getting crispy and juicy chicken tenders becomes much easier.
Soggy Coating
A soft or greasy coating is usually caused by oil that is not hot enough. When the oil temperature drops below 350°F, the coating starts absorbing oil instead of crisping up properly. This is why using a kitchen thermometer makes such a big difference. Also avoid overcrowding the pan because adding too many tenders at once quickly lowers the oil temperature.
Bland Flavor
One of the biggest reasons homemade chicken tenders taste flat is an underseasoned coating. The flour mixture should already taste flavorful before the chicken even goes into the oil. Be generous with salt, garlic powder, paprika, and black pepper so every bite has proper flavor instead of tasting plain after frying.
Coating Falling Off
If the breading falls away from the chicken while frying, the coating probably did not have enough time to stick properly. After dredging the chicken, let the tenders rest on a wire rack for about 10 minutes before cooking them. This helps the coating bond to the surface. It also helps to pat the chicken dry before marinating so excess moisture does not weaken the coating later.
Burnt Outside but Raw Inside
This usually happens when the oil is too hot or the chicken pieces are cut too thick. The outside browns too quickly while the center stays undercooked. Keep the oil between 350°F and 360°F and try to cut all chicken pieces to a similar thickness for even cooking.
Dry and Tough Chicken
Overcooking is the main reason chicken tenders lose their juicy texture. Chicken only needs to reach 165°F internally. Once it hits that temperature, remove it from the oil immediately. The chicken continues cooking slightly from residual heat while resting.
Coating Clumping Together
A messy flour mixture often happens when the same hand touches both the wet marinade and dry coating repeatedly. A simple trick is to use one hand for the wet ingredients and the other for the dry coating. This keeps the dredging process cleaner and helps create a more even, crispy crust.
Frequently Asked Questions
What is the secret to crispy chicken tenders?
The real secret is a combination of buttermilk marinade, cornstarch in the coating, and correct oil temperature. The buttermilk keeps the chicken juicy, while cornstarch creates a lighter and crunchier crust. Frying at 350°F helps the coating crisp up quickly without absorbing too much oil.
How do you make chicken tenders extra crispy at home?
For extra crispy chicken tenders, use a double-dredge method. Coat the chicken in the flour mixture, dip it back into the marinade, then coat it again. Let the coated tenders rest for 10 minutes before frying so the breading sticks better and fries into a crunchy crust.
Why are my chicken tenders not crispy?
Soft or soggy chicken tenders usually happen because the oil temperature is too low. If the oil is not hot enough, the coating absorbs grease instead of crisping properly. Overcrowding the pan can also lower the oil temperature quickly.
What makes chicken crispier, flour or cornstarch?
Cornstarch creates a crispier texture than flour alone. It absorbs less oil and helps form a lighter, crunchier coating. Many restaurant-style fried chicken recipes use a mix of flour and cornstarch for the best balance of crunch and flavor.
How do restaurants make fried chicken so crispy?
Most restaurants use a few important techniques: seasoned flour, cornstarch, double coating, and precise oil temperature control. They also fry chicken in batches and place it on wire racks after cooking to keep the coating crispy longer.
What is the best flour for fried chicken?
All-purpose flour is the most commonly used flour for fried chicken because it creates a balanced coating that becomes golden and crispy when fried. Mixing it with cornstarch improves the texture even more.
Can I make chicken tenders in an air fryer?
Yes. Air fryer chicken tenders turn out very crispy with much less oil. Lightly spray the coated tenders with cooking oil before cooking and air fry at 400°F until golden brown and fully cooked.
Can I bake chicken tenders instead of frying them?
Yes. Oven-baked chicken tenders are a great alternative if you want less oil. Baking them on a preheated wire rack at 425°F helps the coating stay crisp while allowing hot air to circulate around the chicken.
How long should I fry chicken tenders?
Chicken tenders usually take about 3 to 4 minutes per side when fried at 350°F. The exact cooking time depends on thickness, but the internal temperature should always reach 165°F.
What oil is best for frying chicken tenders?
Peanut oil, vegetable oil, canola oil, and sunflower oil are all excellent choices because they have high smoke points and neutral flavors. Peanut oil is especially popular in restaurants because it stays stable at high frying temperatures.
How do I keep fried chicken crispy longer?
Place cooked chicken tenders on a wire rack instead of paper towels. A wire rack allows air to circulate around the coating, preventing steam from softening the crust.
Can I freeze homemade chicken tenders?
Yes. Let the tenders cool completely; freeze them in a single layer first, then transfer them to a freezer-safe bag or container. They stay fresh for up to 3 months and reheat well in the oven or air fryer.
Why does the breading fall off chicken tenders?
The coating usually falls off when the chicken is too wet or the breading has not had enough time to set. Let the coated tenders rest for about 10 minutes before frying so the coating bonds properly to the chicken.
Can I use chicken thighs instead of chicken breast?
Yes. Boneless chicken thighs work very well because they stay juicy and are harder to overcook. Many people prefer thighs for extra flavor and tenderness.
How do fast food restaurants keep chicken crispy?
Most fast food restaurants use pressure fryers, seasoned flour blends, and controlled oil temperatures. They also keep cooked chicken on warming racks instead of sealing it immediately, which helps maintain the crispy texture.
Can I make chicken tenders without buttermilk?
Yes. You can make a simple substitute by mixing regular milk with lemon juice or vinegar. Let it sit for a few minutes before using. This creates a similar tangy marinade that helps tenderize the chicken.
What seasoning makes chicken tenders taste better?
A mix of salt, garlic powder, onion powder, paprika, black pepper, and a little cayenne pepper gives chicken tenders a rich and balanced flavor without overpowering the crispy coating.
Why do restaurant chicken tenders taste better than homemade?
Restaurants usually focus heavily on seasoning, coating texture, and frying temperature. Small details like marinating the chicken, using cornstarch, and frying in properly heated oil make a huge difference in flavor and crispiness.
Nutrition Information (Per Serving, Approximately)
| Nutrient | Fried | Air Fryer / Baked |
| Calories | ~380 kcal | ~270 kcal |
| Protein | ~35g | ~35g |
| Fat | ~15g | ~6g |
| Carbohydrates | ~24g | ~24g |
| Fiber | ~1g | ~1g |
| Sodium | ~680mg | ~680mg |
Note: Values are estimates and vary based on the specific cooking method, amount of oil absorbed, and exact ingredient quantities used.
Recipe Card: Crispy Homemade Chicken Tenders
Recipe Details
Prep Time: 15 minutes
Marinating Time: 30 minutes minimum
Cook Time: 12–15 minutes
Total Time: About 45 minutes
Servings: 4 servings
Yield: 12–14 crispy chicken tenders
Difficulty Level: Easy
Ingredients
For the Chicken
1.5 lbs chicken tenderloins or chicken breast strips cut into even pieces
For the Marinade
1 cup buttermilk
1 large egg
1 teaspoon hot sauce (optional)
For the Crispy Coating
1 cup all-purpose flour
1/2 cup cornstarch
1 1/2 teaspoons salt
1 teaspoon garlic powder
1 teaspoon onion powder
1 teaspoon smoked paprika
1/2 teaspoon black pepper
1/2 teaspoon cayenne pepper (optional)
For Frying
Vegetable oil, canola oil, or peanut oil for frying
Instructions
Step 1: Marinate the chicken.
In a large bowl, whisk together the buttermilk, egg, and hot sauce until smooth. Add the chicken and coat every piece well. Cover and refrigerate for at least 30 minutes. For deeper flavor and juicier chicken, marinate for up to 12 hours.
Step 2: Prepare the Coating
In a wide shallow bowl, combine the flour, cornstarch, salt, garlic powder, onion powder, smoked paprika, black pepper, and cayenne pepper. Mix thoroughly so the seasonings are evenly distributed throughout the flour mixture.
Step 3: Coat the Chicken
Remove the chicken from the marinade and allow the excess liquid to drip off. Press each piece firmly into the flour mixture until fully coated. For an extra crispy texture, dip the chicken back into the marinade and coat it a second time. Place the coated tenders on a wire rack and let them rest for about 10 minutes before frying.
Step 4: Heat the Oil
Pour oil into a deep heavy-bottomed pan or Dutch oven until it reaches about 2–3 inches deep. Heat the oil to 350°F (175°C). Using a thermometer helps maintain the right temperature and prevents greasy chicken.
Step 5: Fry Until Crispy
Carefully place the chicken tenders into the hot oil in small batches. Fry for about 3–4 minutes per side until the coating turns deep golden brown and crispy. The internal temperature should reach 165°F.
Step 6: Rest and Serve
Transfer the cooked tenders to a clean wire rack instead of paper towels. Let them rest for 2–3 minutes so the coating stays crispy. Serve hot with your favorite dipping sauces.
Recipe Notes
For extra crispy chicken tenders, always let the coated chicken rest before frying. This helps the breading stick properly during cooking.
If using an air fryer, cook at 400°F for about 7–8 minutes per side, lightly spraying the tenders with oil before cooking and again after flipping.
For oven-baked chicken tenders, bake at 425°F on a preheated wire rack for 20–22 minutes, flipping halfway through cooking.
To freeze, allow the chicken tenders to cool completely before placing them on a baking sheet in a single layer. Once frozen, transfer them to a freezer-safe bag or container for up to 3 months.
For reheating, use an air fryer at 375°F for 4–6 minutes or an oven at 400°F for 8–10 minutes to keep the coating crispy.
More Recipes You Might Enjoy
Easy Air Fryer Chicken Breast
The Best Homemade French Fries
Crispy Fried Chicken Recipe
Honey Mustard Dipping Sauce
Homemade Macaroni and Cheese
More easy dinner recipes and cooking guides are available on Cooking Nations
Final Thoughts
These crispy homemade chicken tenders are crunchy on the outside, juicy in the center, and packed with flavor from the first bite to the last. The buttermilk marinade keeps the chicken tender, while the seasoned coating creates that golden, restaurant-style crunch people look for in a great chicken tenders recipe.
Whether you choose deep frying, air frying, or baking in the oven, this recipe gives reliable results without complicated techniques or hard-to-find ingredients. Once you make homemade chicken tenders this way, frozen versions rarely compare in texture or flavor.
For more family-friendly meals, easy comfort food recipes, and step-by-step cooking guides, visit Cooking Nations
Crispy Homemade Chicken Tenders Recipe | Easy & Crispy

Chicken Tenders Recipe Juicy chicken inside, crispy golden coating. How to Make Homemade Chicken Tenders in 30 Minutes .
Type: Dinner
Cuisine: American
Keywords: chicken tenders recipe, crispy chicken tenders, homemade chicken tenders, fried chicken tenders, air fryer chicken tenders, oven baked chicken tenders, crispy fried chicken, easy chicken recipe
Recipe Yield: 4 servings
Calories: 380 calories
Preparation Time: PT15M
Cooking Time: PT15M
Total Time: PT45M
Recipe Ingredients:
- 1.5 lbs chicken tenderloins or chicken breast strips 1 cup buttermilk 1 large egg 1 teaspoon hot sauce (optional) 1 cup all-purpose flour 1/2 cup cornstarch 1 1/2 teaspoons salt 1 teaspoon garlic powder 1 teaspoon onion powder 1 teaspoon smoked paprika 1/2 teaspoon black pepper 1/2 teaspoon cayenne pepper (optional) Vegetable oil, canola oil, or peanut oil for frying
Recipe Instructions: Step 1: Prepare the Marinade Whisk together buttermilk, egg, and hot sauce in a large bowl until smooth. Step 2: Marinate the Chicken Add chicken tenderloins to the marinade, coat evenly, cover, and refrigerate for at least 30 minutes. Step 3: Prepare the Coating Mix flour, cornstarch, salt, garlic powder, onion powder, paprika, black pepper, and cayenne pepper in a shallow bowl. Step 4: Coat the Chicken Remove chicken from marinade and coat each piece evenly in the flour mixture. Step 5: Double Coat for Extra Crispiness Dip coated chicken back into the marinade and coat again in flour mixture. Let rest for 10 minutes. Step 6: Heat the Oil Heat oil in a deep heavy pan to 350°F (175°C). Step 7: Fry Until Crispy Fry chicken tenders in small batches for 3–4 minutes per side until golden brown and fully cooked. Step 8: Rest and Serve Transfer tenders to a wire rack, rest for 2–3 minutes, and serve hot with dipping sauces.
5